
Sharpening of portrait photos
April 26, 2017 at 1:26:45 PM GMT+3Contents
This lesson is part of a larger section on retouching skin in Photoshop. For a more detailed study of photo retouching (unless you don't want to use online photo editing service) we recommend you to read the other articles on the topic:
- Removal of blemishes and skin imperfections
- Quick skin smoothing
- Skin smoothing preserving its texture
- Skin enhancing and adding texture
- Smoothing the skin using the color channels
- Remove or reduce wrinkles
- Removing flash glare
- Skin tone harmonization
- Makeup photo editing
- Creating a porcelain skin effect
- Sharpening of portrait photos
In most cases, sharpening of photos of men is easy. Clear skin texture looks good for them. But when retouching photos of women’s, we need to avoid increasing the clarity of skin texture in all possible ways. Instead, you should try to enhance the sharpness of only some fragments with important details, such as eyes, mouth, eyebrows, etc. There are three ways to do this: the first method is very fast, it allows to achieve a pretty good result; the second one requires more time and effort, but it ensures that the sharpness of the image will be enhanced only at the necessary parts; and the third method of sharpening in Camera Raw.
Quick method of sharpening
Let's start with the quick method, which, most likely, you'll use more often than others. It is to edit just the red channel of three color channels of the image (red, green and blue) because this channel contains least skin texture (what you will see later). But first, to understand why we use the filters of sharpening only for the red color channel, let's consider the other two color channel of an image.


Step 1
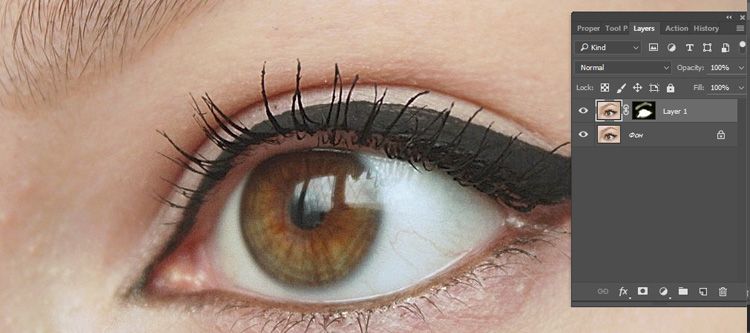
In the Channels panel select the blue color channel, as shown in the figure. (Select the corresponding item in the Window menu if the panel is not already open in the working window of the program.)
We intentionally increased the scale of the interested area of the image to clearly show, how much texture there is in this channel. If you increase the sharpness in the image channel, the whole texture of the skin will be much clearer and we need to avoid this at any cost.

Step 2
Select the green channel of an image (it can be a good version of black and white image). Here we can see much less texture, although it is still noticeable. Since we want to highlight the texture of skin in the process of sharpening skin as little as possible, this channel is more preferable compared with the previous versions.
Step 3
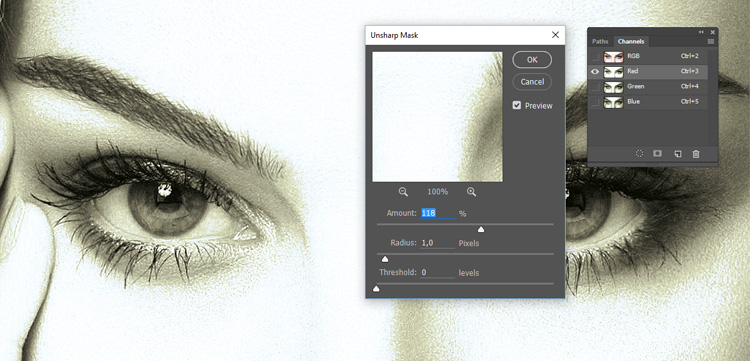
Click on the red color channel and look at the image. In fact, this channel displays the fragments of some important parts, such as eyes, eyebrows, etc., and the skin texture is almost imperceptible. Thus, the red color channel contains the objects which sharpness we want to improve, and there is almost no texture, which doesn’t need to be increased. That is why the red color channel is ideal for sharpening of women's portrait photos. When the red channel is selected, run Filter -> Sharpen -> Unsharp Mask and in the filter dialog box enter its value: for the Amount parameter — 120%, for the Radius - 1.0 and for the Threshold parameter - 0. These settings are perfect for sharpening of portrait photos when the sharpening filter is applied only to the red channel of the image.
Step 4
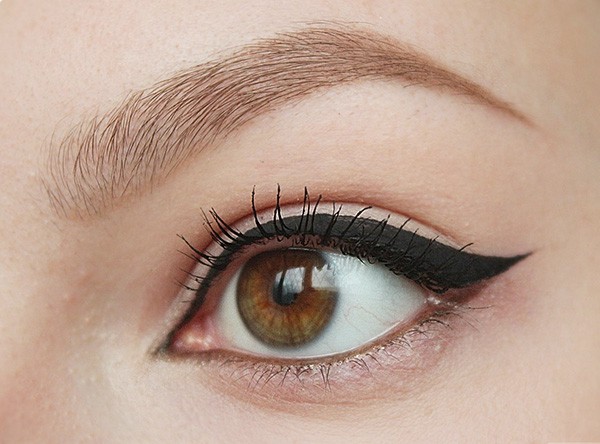
Click OK to close the Unsharp Mask filter dialog box, and in the Channels panel, select the composite RGB channel in order to display a colored version of the edited image in the program window, as shown in the figure. Look at the image of the eyes, lips and even gemstones, they look much sharper. But we hardly increased the sharpness of the fragments of the skin. If necessary, move the newly created layer to the Luminosity blending mode.

Video tutorial
More time consuming method of sharpening
The second method requires much more time and effort, but in this case, you are completely sure that you can improve the sharpness of only the necessary fragments. In the beginning we do the same step as in the method of enhancing of male portrait photography. But in step 2 we will say where you need to stop.

Step 1
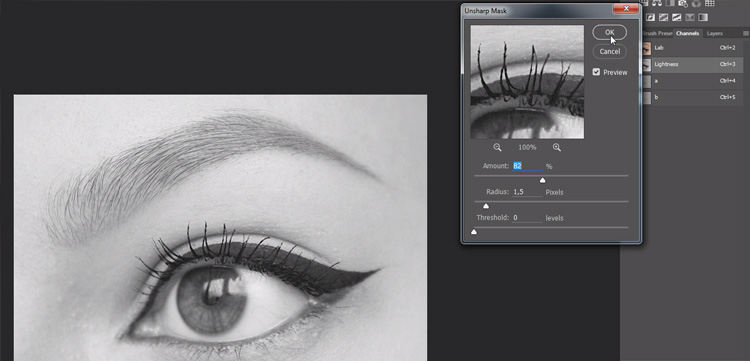
So, run the command Image -> Mode -> Lab Color, and then use the key combination < Ctrl + J > (<⌘ + J >) to duplicate the image background layer. Thus, you move from working in the RGB color space to work in “Lab Color” color space. Despite the fact that the Channels panel has changed, the picture remained unchanged, and its quality hasn't suffered in the process of converting from one color space to another. In fact, in the “Lab Color” color space, the color and details of the image are stored in different channels. The color information of the image is contained in the channels a and b, and the information about its details — in the Lab channel. Select the Lightness channel in the Channels panel and then apply the Unsharp Mask filter with the following parameters: Amount parameter — 81%, Radius parameter - 1.5 and the Threshold parameter to — 0. You can see the difference between the original and the edited image both in the filter dialog box and in the program window.
Step 2
Run the command Image -> Mode -> RGB Color to return to work in the RGB color space. Click Don't Flatten in the dialog box. If we retouch a picture of a man, on this stage you can stop, save your changes and close the image. But if we are talking about the female portrait photography, you need to perform some additional actions. Hold down < Alt > (Option), click on the Add Layer Mask icon, which is available at the bottom of the Layers panel to hide the edited layer behind a black mask, as shown in the figure. Press <D> to specify white as the dominant color. Use the Brush tool and select a small brush with soft edges and 100% opacity. Sketch the parts of the image that should be clearer (eyes, hair, nostrils, eyebrows, eyelashes, lips, jewelry, nails, etc.). Thus, this technique takes more time and effort, but the effect of sharpening is applied only to the desired parts of the image. The clarity of skin texture isn’t absolutely changed.

Video tutorial
The method of sharpening with Camera Raw
The third method of sharpening of women's portrait photography is to use the appropriate tools of Camera Raw masking module. To do this with Photoshop, run File -> Open As and in the dialog box, select the file in JPEG, TIFF or PSD format, sharpening of which you want to improve. In the Open As drop-down list, select Camera Raw and click on the Open.


Step 1
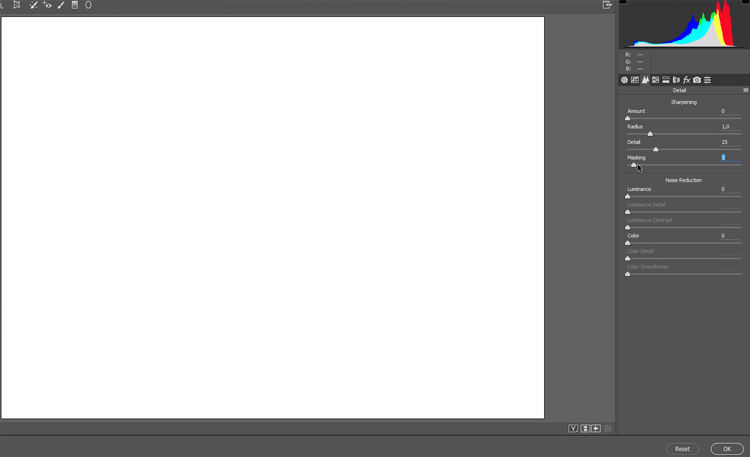
In the Camera Raw dialog box select Detail panel, in the top of which a group of settings for Sharpening is available. In this group, the Amount and Radius sliders work the same as similar sliders of the Unsharp Mask filter, and the Masking slider is the key element, which allows to effectively increase the sharpness of the female portrait photo. Start with clicking on the Masking slider, hold down < Alt> (< Option >). The image in the preview window becomes completely white. This indicates that the sharpness of the image will increase evenly across the surface.
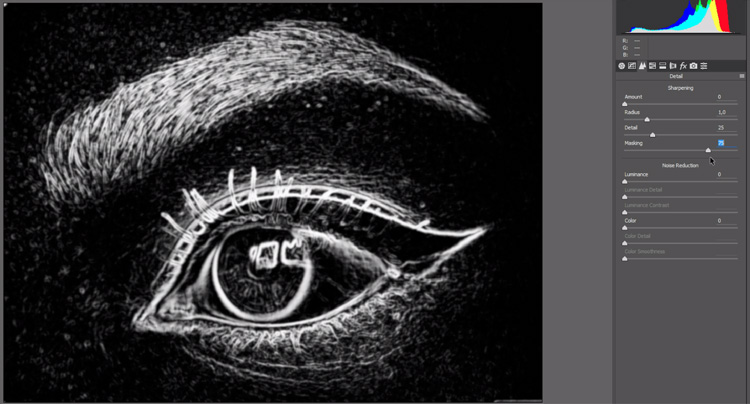
Step 2
As you drag the Masking slider to the right, some fragments become black. The sharpness of the image fragments, which are black in the preview window, does not increase. As the figure shows, the area of the skin now looks completely black (hence, the sharpness of these fragments will not be amplified). Those fragments which sharpness you want to improve is now displayed with the white color (hair, eyes, lips, nostrils, jewelry, etc.). Drag this slider to protect those fragments, the sharpness of which shouldn’t be improved, and to preserve white only those fragments, the sharpness of which needs to be reinforced (in this case, we dragged the slider to the level of 75). Now you can enhance the sharpness of the image.
Step 3
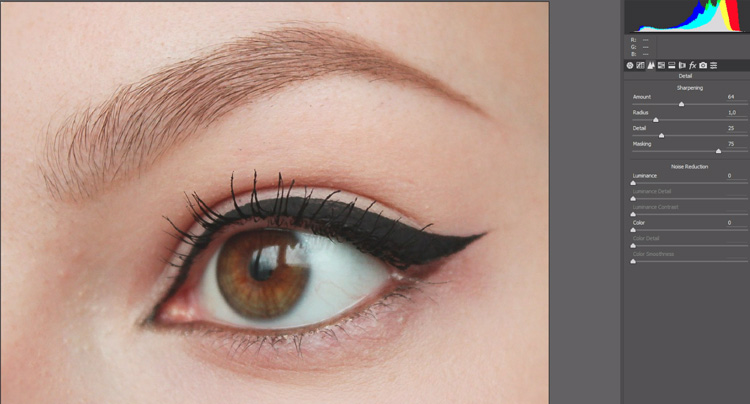
Drag the Amount slider to the value at which the image sharpness is increased to the desired extent (when the Radius parameter is set to a value of 1.0, and the Details parameter, that is mainly designed to remove light effects on the edges of the objects, is set a value of 25). In this case, for the Amount parameter we set it to 64, as shown in the figure. That's all. Now click on the Open button to open the image with Photoshop for further processing, or the Done button if the image retouching has been completed.
Video tutorial
Try all these three methods for sharpening portrait photography in practice and select the one that fits the best. All the three methods provide excellent results, without exacerbating the skin texture of the face.